


& Forbidden Industries
AT A GLANCE

Once the Falcon is unpacked you will be introduced with:
The aircraft itself (Falcon 7x ver.)
A LITE version which is a plane without the kelly GPS
The aircraft HUD (Falcon 7x HUD ver.)
Flight Manual
Flight Checklist
Aircraft CPAT
Some quick stats and tips:
Take of speed: 120 Kts
Climb speed: 170-200 Kts
Cruise speed: 200-220 Kts
Landing speed: 115-130 Kts
think of your pitch as your airspeed control and your throttle as your altitude control.
If you'd like to climb, throttle to 100% then pull back on your controls to maintain 200 kts. you'll find that the plane will climb however, the rate or speed that you climb will depend on your pitch.
the same applies for decent.
Compensate for drag when extending flaps and gear. the plane WILL slow down substantially. its not uncommon to push to 80% throttle to keep the aircraft level in a dirty configuration (flaps and gear down)
This plane is capable of going fast. like. really fast! but just because you can doesnt mean that you should! watch your airspeed at all times and maintain a safe cruise speed. Use the autopitch hold (on by default) for steady, slow flights!
Send Kyo Cipher (kev barony) a message if you still need assistance!
THE HUD
Lets start fresh, First off the HUD! While sitting in the aircraft pilots seat, say "HUD" in order to receive the pilot hude. note that we will be going in order for operation as if we were following the checklist for the sake of simplicity. If you JUST need the checklist and nothing else, feel free to skip ahead

There is alot to play around with here but we are going to break down everything and explain how it all works.

The bottom most point are toggles to bring up different sub menu's with the green arrow signifying that the sub menu is being displayed
Power Panel: Hosts the GPU, APU, Quick start and Battery Buttons
Engines Panel: Hosts the starter switches for engines one, two and three
Lighting Panel: Hosts the lights both internal and external for the aircraft
Systems Panel: Hosts the Hud, AutoPilot, Throttle and GPS display's
Camera Panel: Hosts all possible camera angles
Aircraft Settings: Hosts general aircraft functions and settings
Sensitivity Panel: hosts the Sensitivity and Trim controls

Next, we have
The HUD: All the flight information you'll ever need
AutoPilot Panel: So you can let the plane fly itself
Throttle Panel: Hosting the Gear, Parking break, Tug, Reverse Thrust, Flaps and spoilers
GPS Panel: Kelly's GPS system
POWER

So now lets go over individual functions starting with the POWER panel
There is a flow for each panel, in this case we start from bottom to top
Batt: Toggles battery power which allows aircraft systems and panels to come alive.
Q/Start: This is your quick start/stop function. The falcon is capable of doing the start up sequence for you leaving you ready to taxi immediately. This also functions as a quick stop, shutting down engines for you. This button is optional. If you'd like to perform the startup yourself, skip over this button
APU: This is your auxiliary power unit. This is essentially a power generator built into the aircraft that also provides bleed air to start your aircraft. Without this, the engines cannot start.
Rez GPU: GPU=Ground Power Unit. Don't want to wait for your APU to spool up? This will rez a power generator that works much like the APU but externally. With this you can also start the engines since it provides its own bleed air.
ENGINES

Next up, the ENGINE panel. Here you will be able to start your engines. So long as your battery and your APU or GPU is on you will be able to click in here
Eng 1: Will start your left engine
Eng 2: Will start your center engine and ptu (power transfer unit: A system that transfers hydraulic power from one system to another in the event of a failure)
Eng 3: Will start your right engine
You do not have to wait for any one engine to start before starting the other
Lighting

Now lets talk about other pilots seeing you... The LIGHTING panel! If you want to learn more about aircraft lighting, reference: 14 CRF Section 91.209 There you will see what the FAA rules for the united states are for aircraft lighting, however! listed in the above image is just a basic idea of how it works. These lights are meant for other pilots and have their purposes as such. Follow it as you see fit or don't. This is only second life after all.
Beacon: This turns on your beacon strobes. This light comes on when your battery comes on letting others around you know that your aircraft is active.
Nav: These are the Red (left wing) Green (Right wing) and White (Rear of aircraft) lights that are designed to let others know what direction you are facing in relation to them.
Strobe: These flashing strobes on the wingtip and rear are just that, strobe lights to help others find and see you.
Taxi: This serves two purposes. To help you as the pilot see in front of you on the ground and to let others around you know that you are intending to or are already performing ground operations
Landing Lights: Once you're on the runway with the intention (and clearance) to take off, turn on your landing lights to let everyone else know. once in the air they are recommended to stay on until at or above 10,000 feet (in SL id like to consider that to be 100 meters but your preferences may be different.) use the solid lights for night operations to help you see. and the strobing lights as a means to be easily seen by others during the day while taking off, landing or flying below cruise
Panel Lights: These illuminate just the panel to help see your instruments during night ops
Cockpit Lights: This is a dome light that illuminates all of the cockpit
Passenger Lights: This lights up the entire passenger cabin
SYSTEMS
HUD

Now that our engines are on, our lights are good, its time to get flying! So we Click the SYSTEMS panel and we are going to need our HUD for reference while flying!
VERY BASICALLY this is how it all works
Airplane Wings: That is you. those are your wings and the orientation the are in reference to the HORIZON
Horizon: The earths horizon. Down is the ground, Up is the sky. You will see the exact pitch in degrees your aircraft is in along with bank angle, especially useful when flying in IFR conditions
Flight Path Vector indicator: The airplane wings are where you are. the flight path vector indicator is where you are going to be if you do not add any control input.
Airspeed: This is how fast you are going in knots
Altitude: This is how high you are off the ground from sea level
Vertical speed indicator: This tells you if you are climbing or descending and at what rate.
Compass: This displays aircraft heading.
AUTOPILOT

So at this point we would be airborne, starting our procedures en route to our destination. We can make our lives easier by letting the aircraft fly for us!
In order to do this you must first set perimeters.
What heading do you want the aircraft to fly? Set that manually using the up or down arrows directly under "HDG" or use the compass window by simply clicking on the heading you want to go.
What speed do you want to fly? Set the airspeed you want the aircraft to hold using the arrows here.
What altitude do you want to fly? Set the altitude you want the aircraft to reach and maintain using the arrows here.
Next, Click on Hdg, Spd or altitude depending on which perimeters you want the aircraft to hold.
After that, click AP. This will activate autopilot! Let go of the controls and let the plane fly. You can adjust heading, speed and altitude in real time and the plane will adjust for you.
When its time to take control again, simply press AP again and press SPD to turn off auto throttle.
AutoPilot Chat commands and instructions Simplified:
Set airspeed: "Spd ###"
example:
Spd190
this will set your speed hold to 190Kts
Set altitude: "Alt####"
example:
alt300
this will set your altitude hold to 300
Set your heading: "hdg###"
example:
hdg270
this will set your heading hold to 270
THE PLANE WILL NOT DO ANYTHING UNTIL YOU ACTIVATE AUTOPILOT SYSTEMS AS FOLLOWS:
"ah" Will activate altitude hold
"hh" Will activate heading hold
"ap" Will activate autopilot master. SO LONG AS Altitude hold and Heading hold are active and you turn on the autopilot master, the plane WILL fly itself from here on out.
"apt" will activate autothrottle which is independent from autopilot! this will stay on regardless if ap master if on or off and will maintain set airspeed
THROTTLE

We need to lift our gear! we need to release the parking break! what do we do!
All motion controls are left in the THROTTLE Panel
From top to bottom:
Landing Gear button: Lifts and drops your gear
Parking Break: Set when stopped preventing the aircraft from moving
Tug Bot: This is your pushback tool. This will Rez the TUG BOT as shown above. once rezzed, Click on the TUG BOT. You will get a menu as shown above. Select START, Release your parking brake and then select Auto Pushback which will push your plane back for you, or use the arrow keys to control the tug yourself. Once done, click the tug bot again, select stop, then delete.
Reverse Thrust: this manually enables reverse thrust on touchdown if it hasn't automatically engaged. Some of you may use it as a way to back your aircraft up and while the falcon is simply not capable of providing reverse thrust in real life, we did give you the ability to do so here on sl.
Throttles: You have three engines therefor you get three levers. Use PGUP or PGDN in order to adjust throttles together, however if for whatever reason you want to control an engine individually simply click over the desired setting for the desired lever
AirBrakes: Manually deploy's airbrakes. Note that on the falcon they spoil the air over the wing causing a loss in lift. They should also extend automatically on touch down.
Flaps: Set your flaps using this lever. simply click down over the setting you'd like.
SHERGOOD GPS

Alright so now we get to navigating our grid. This portion will cover the instruments both inside the aircraft and on the hud since they are exactly the same. You will be greeted with the window on the left. Click on the ACTIVATE button to get the shergood gps online.

You'll be greeted with this screen. Where going to break this all down best we can but, in summery. Red airplanes are other aircraft. Yours is green.
Airports are the blue circles with the white lines through them
and navigation points are triangles.
Click here for the live GPS radar page.

Starting front top to bottom, Left to right:
IDENT: Means it is currently making your radar blip enhanced
XPDR 1200 ALT: this is your current transponder setting: 1200 alt: Alt is altitude encoding
So others can see your location AND altitude
XPDR: Allows you to set your transponder code
FPL: Allows you to set up a flight plan
Des: Allows you to set up your "Designation": Flight number, Plane type (name) etc.
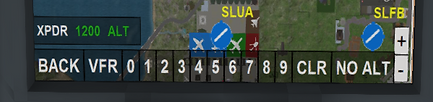
Back: Jumps back to the main window
VFR: Snaps to 1200
0-9: lets you select your code
CRL: Clears the selection
No alt: Makes it so your transponder just shows position no altitude
Alt: makes it so your transponder shows both your position and altitude

Overlays come as pretty self-explanatory
Checking an options allows you to show statuses on the GPS windows

Flight designation allows you to set your aircraft:
Type: Type of model
Tail#: your N number as it appears on your tail
Flight #: for role-play and airline flights
And your pilot


This is your flight plan window
Simply it already sets your point of origin
You are to set your destination and waypoints if you’d like then hit activate to make it active.
When you arrive at your destination, close your flight plan so it resets

As a flight plan is set you will get your Ground speed, Distance to target
And estimated time till arrival
CAMERA

Rigid Static rear camera
Smooth Dynamic rear camera
Cinema camera mode
Top Down view (Ideal for tug bot operation)
Left Side view
Right Side view
Cockpit center panel view
Aircraft Settings

POPUP menu brings up aircraft settings (Discussed below)
LOCK SEATS menu makes it so that people cannot sit on the aircraft unless they have done so before setting a lock
AUTO TRIM The aircraft has a fly-by-wire system built in helping maintain a pitch. If you'd like to turn that system off you would click there
SAFE MODE: If you do not want ground or water crashing effects you can turn this on otherwise turn it off for the crash effects
FUEL SYSTEM: Airplanes burn fuel! You want that to be simulated? turn this on! you'll get fuel quantity on the right of the menu
HOVER TEXT: Brings up hover text on the rear of the aircraft so that you don't need to wear a hud for flight
GUEST MODE: Allows anyone to sit and fly the aircraft from the pilots seat
REPAIR PLANE: did you crash? Well. simply click this button. it should fix your airplane leaving it ready to fly again

POPUP MENU:
Edit On: If you would like to modify your aircraft and add or remove mesh from it this button will set all the scripts to NOT RUNNING. That way you can make the modifications you want without the aircraft destroying your hard work when you try to fly it!
When you finish editing your aircraft, click it again to activate scripts once more.
TAIL NUMBER: Set your tail number to whatever you want! You're limited to 0-9 and A-Z
OPTIMIZE: Kelly's GPS is a little hard on sim crossing at times. Click this button to have the option to remove kelly's scripts from your aircraft. You should have gotten that option upon first rez too
CANCEL: closes the popup
PAINTS: Change between 6 different liveries
DISPLAY MODE: The scripts are turned off in order to leave the aircraft parked without introducing lag to the sim
TOGGLE SHADOW: This plane comes with a dynamic shadow that actually sticks to the ground rather than being stuck to the airplane and looking weird! click here to toggle it

SEAT LOCK MENU
COPILOT: Makes it so no one can sit in the copilots seat. Cabin seats are left unaffected
ALL CABIN: Makes it so no one can sit in the passenger seats. COPILOT SEAT is left unaffected
TCAS/SENSITIVITY

Next we get the far right mini panel.
TCAS: Is your traffic collision avoidance system which tells you if you are about to crash into another airplane
TRIM/SENSITIVITY:
Your trim allows you to hold back pressure on a particular input. with the controls arrows on the left you can trim your aircraft to pitch, roll and yaw.
PITCH TRIM: Green numbers mean you are trimming down, Blue means you are trimming up
ROLL TRIM & YAW TRIM : Red numbers mean you are trimming left, Green means you are trimming right (Wing tip lights)
SENSITIVITY: Unfortunately SL does not support joysticks but if you want to control how much of an input you give, adjust your sensitivity. Higher sens. is a snappier feeling, lower is more sluggish.
Weather

Lastly, We have our weather button. Flying with realistic physics is fun and all but there's just one thing missing... Lets throw a thunderstorm in the mix!
On the hud, if you click this button you will be greeted with the Weather Popup window.

So from left to right, top to bottom
SL WIND: Set the preset to just Secondlife wind speed and direction.
CUSTOM: Here you can set your own turbulence, wind speed and direction with no limitations (Have fun!)
Cancel: Simply closes this window
Wx ON: This is the master switch for this system. Turn this on to get weather effects on the aircraft physics
Wx OFF: This turns off the weather effects
Weather Presets: This has a list of preset weather conditions from clear skies to thunderstorms. an easy setup.
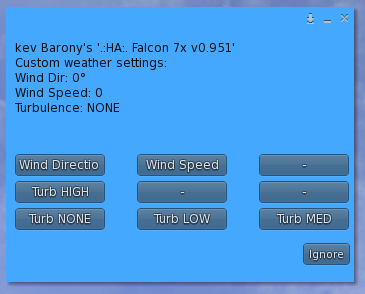
Custom Weather settings window

Preset Weather settings window
THE COCKPIT

Welcome to your new office, let me show you around. Very basically the Pilot or Captain is sitting on the left with priorities given to that avatar. The Copilot or First Officer
sits on the right. They do not have the direct ability to fly the airplane until the pilot gives them controls. However, they CAN manage systems. Toggle engines, lights, ect.
THE OVERHEAD PANEL

The Falcon 7x is almost completely computer controlled. Sure Fly-by-wire takes care of the flying but the advanced computers of the falcon take care of generators, hydraulics
EVERYTHING! Thats great for your as a pilot becouse just as in real life the checklist to start is very simple:
BATTERY: ON (Click the red battery switches)
APU: ON (Click on APU Master)
Lights: Refer to the LIGHTING sub section of HUD above for more information or the checklist down bellow
All other systems are handled automatically which leaves you as the pilot without the responsibility. You do get fire suppression control in-case an engine catches fire
(Manually triggered)
THE CENTER PANEL

Next after the battery and APU we make our way down to the center console.
The fuel flow switches control just that. However when flipping them on the Aircraft automatically starts the start up procedure.
After that all three engines should be running and you should be ready to go!
Airbrakes, Flaps and trim controls are lower and your throttles are there to show you roughly your power setting.
THE MFD

The MFD is what you're going to be staring at most of the time aside from the hud. In the Image I have listed some of the common functions of the display This display
will also host your AUTOPILOT settings in PURPLE
AUTOPILOT PANEL

The same functions found on the HUD can be found here on the autopilot panel. Buttons can be clicked in the cockpit like the battery and apu can
AutoPilot Chat commands and instructions:
Set airspeed: "Spd ###"
example:
Spd190
this will set your speed hold to 190Kts
Set altitude: "Alt####"
example:
alt300
this will set your altitude hold to 300
Set your heading: "hdg###"
example:
hdg270
this will set your heading hold to 270
THE PLANE WILL NOT DO ANYTHING UNTIL YOU ACTIVATE AUTOPILOT SYSTEMS AS FOLLOWS:
"ah" Will activate altitude hold
"hh" Will activate heading hold
"ap" Will activate autopilot master. SO LONG AS Altitude hold and Heading hold are active and you turn on the autopilot master, the plane WILL fly itself from here on out.
"apt" will activate autothrottle which is independent from autopilot! this will stay on regardless if ap master if on or off and will maintain set airspeed
THE FMS


The FMS Provides useful references for the PILOT MANUAL, CHECKLISTS, CHAT COMMANDS, QUICK CONTROLS, FMS PlANNER and GLOBAL MAP Simply click on the
display in order to start it.
Pilot Manual: This Page
Checklists: A quick reference to checklists while flying the aircraft
Chat Commands: All the chat commands to control the aircraft
FMS Planner: Set auto-pilot and ILS Systems (more on that below)
Global Map: Shergood Radar Map

Steps to setup FMS Autopilot

1. Create note card (above is an example for Jadu to Meighen

2. Place notecard in the Falcon 7x Root prim (simply drag the notecard over any part of the airplane)

3. Click anywhere in the RED area and select your flight plan or say "FMS"
4. You should see this message

5. Activate Heading Hold ("hh") and Altitude Hold ("ah")

6. Set your cruise speed "spd ###"

7. Once airborne set your AutoPilot ("ap") and your AutoThrottle ("apt") and the plane will fly itself!
Note that the ILS system will come online after crossing the final waypoint to your destination
EXTERNAL STALL WARNING
For those who prefer to fly in external view we have given you a floating stall warning! if you see this you can correct and perform recovery

THE CABIN


And now for your passengers, Each of them with the exception of the two that sit on the sofa's will get their own screens that all function the same exact way. Click directly on the screen and you'll get these options.
TRACK YOUR FLIGHT: Takes you to Kelly's Radar page
INTERNET SEARCH: allows passengers to search google (We are not responsible for any content displayed as a result of this)
TV MEDIA: allows passengers to search youtube.com
About the Falcon 7x: Directs passengers to the F7X Brochure
Husky Aviation: Directs passengers to Husky Aviation website
ZSK Digital Designs: Directs passengers to Husky Aviation website
Time to fly!

And now it’s time to fly! What we are going to cover are basic controls and letter commands
NOTE: the shift commands REQUIRE the gestures that come with the aircraft to be active.

Chat commands
Help - gives note card
mlt - Mouse Look touch controls (in cockpit)
shad - Aircraft shadow toggle
br - parking brake
bat - battery on/off
nl - nav lights
bl - beacon lights
ll - landing lights
lls - landing strobe lights
sl - strobe lights
tl - taxi lights
cbl - cabin lights
cl - cockpit lights
sblt - seeatbelt warning
gpu - ground power unit
apu - auxiliary power unit
s1 - engine 1
s2 - engine 2
s3 - engine 3
tug - tugbott
c1,c2,c3,c4,c5,c6,c7 - camera position
g - landing gear
f : Cycle Flaps
aut : Auto Trim System Toggle
fu: flaps up
f+: cycle flaps down
f-: cycle flaps up
fn followed by a number to set the flaps
fd : flaps down
ab 0-1-2:airbrake set
safe : toggle safemode
guest : toggle guest mode
hud : gives you a hud
text : hover text over the tail
sen 10-100:set the sensitivity
wx : open menu wx weather effects
ct : toggle pilot copilot
boot : to eject passenger
seat : to set up your seat position
repair : repair command when broke
tcas : toggle traffic control
cws : toggle warning system voice
at -20/+20 set alierol trim
et -20+20 set elevator trim
rd -20 +20 set rudder trim
ap : autopilot
spd : set the speed of autopilot
hdg 0-360 : set direction autopilot
apt : toggle autopilot speed on/off
qs : quick start
lag : reset seat position
lock : open menu for locking seat
menu : open menu of aircraft
ah : toggle altitude hold
hh : toggle heading hold
fire 1/2/3:set engines on fire
ext1/2/3:extinguishes fire on engines
r:toggle reverse trust
t1/2/3/0-100%:set engine power
fuel:toggle fuel consuming
refuel 100/35000:set fuel
Checklists!
This is not a replica checklist and should not/never be used for the CRJ-700 in real life. This is Simply an RP checklist you can tie in with your hud buttons for Roleplay purposes
(Don't think I should even be warning you guys about this but im sure it made some of you giggle >.>)
--------------------------------------------------------------------------------------------------------------
Rez Checklist:
Aircraft: Rezzed
HUD: Attached
Walk around: Start from Main Left Door and walk aircraft counter clockwise checking:
-Main Door (unobstructed by surrounding environment)
-Wings
*Left Landing Light Visible and clear and off
*Slats unobstructed and undamaged
*Left NAV (Red) and Strobe Lights visible and clear and off
*Left Aileron Unobstructed and clear
*Left Outer Flap Unobstructed and clear
*Left Inner Flap Unobstructed and clear
*Main Gear check
-Left Engine
*Tail Number set (Set your tail number by clicking the aircraft and selecting Tail number)
*Clear and unobstructed
-Tail
*Center Engine/reverser clear and unobstructed
*Vertical Stabilizer and rudder unobstructed and clear
*Horizontal Stabilizer and elevators unobstructed and clear
-Right Engine
*Tail Number set (Set your tail number by clicking the aircraft and selecting Tail number)
*Clear and unobstructed
-Wings
*Right Inner Flap Unobstructed and clear
*Right Outer Flap Unobstructed and clear
*Right Aileron Unobstructed and clear
*Right NAV (Green) and Strobe Lights visible and clear and off
*Slats unobstructed and undamaged
*Right Landing Light Visible and clear and off.
*Main Gear check
-Nose
*Nose Gear check
*Unobstructed
Main door: Checklist complete...
-------------------------------------------------------------------------------------------------------
Start Checklist:
Pilot: Seated
Seat height adjusted properly.
Co-Pilot (if available): Seated
Seat height adjusted properly.
Hud Link <==> Hud: Established
Battery: On
Beacon Light: On
APU (or GPU): On
Cabin Light: On
Panel Light (If needed): On
Cockpit Flood Light (If Needed): On
Fasten Seatbelt Sign: On
No Smoking Sign: On for duration of flight
Passengers (if available): Boarded and Seated
All Doors: Shut and locked
Engine 1 Ignition: On
Engine 2 Ignition: On
Engine 3 Ignition: On
Verify Engine output (N1/N2 in green): Check
APU (GPU if used) : Off
NAV Lights: On
Strobe Lights: On
Start Checklist Complete...
-------------------------------------------------------------------------------------------------------
Taxi Checklist
Cabin Lights: Off
Taxi Lights: On
Wheel/Parking Brake: Released
Throttle: Between 5%-30% (30% to start rolling)
Taxi Speed: 15-30 Knots
Flaps: Set for takeoff (One notch down)
Taxi Checklist complete
-------------------------------------------------------------------------------------------------------
Takeoff Checklist
Taxi Lights: Off
Landing Lights: On (strobing during day ops.)
Lined up with centerline: Check
Throttle: 100% Check
Rotation speed: 120 Knots
Rotate: 10-20 degrees positive
Establish Positive Rate: Check
Takeoff checklist complete
-------------------------------------------------------------------------------------------------------
After Takeoff Checklist
Gear: Up
Flaps: Up (After reaching 50 meters)
Climb Throttle: 75%-100%
Climb Speed: +180 Knots
Climb Angle: 10-20 degrees
After Takeoff Checklist Complete
-------------------------------------------------------------------------------------------------------
Cruise Checklist
Throttle: Set to 45%-55%
Fasten Seatbelt Sign: Off
Landing Light: Off (Only after reaching 100+ meters)
Cruise Checklist complete
-------------------------------------------------------------------------------------------------------
Decent Checklist
Fasten Seatbelt Sign: On
Landing Light: On (Only after descending below 100 Meters)
Flaps: set as needed
Decent Checklist Complete
-------------------------------------------------------------------------------------------------------
Approach checklist
Cabin: Prepared for landing
Flaps: Set gradually to full
Gear: Down and locked
Approach speed: 150 Knots
Touchdown Speed: 120 Knots
Approach Checklist complete...
-----------------------------------------------------------------------------------------------------
After Landing Checklist:
Clear of runway
APU: On
Taxi Lights: On
Landing Lights: Off
Flaps: Up
Spoilers: Retracted
Taxi Throttle: 0%-30%
Taxi Speed: 15 - 30 Knots
-----------------------------------------------------------------------------------------------------
Shutdown/Parking Checklist:
Parking/Wheel Break: Armed and Locked
NAV Lights: Off
Strobe Lights: Off
Taxi Lights: Off
Cabin Lights: On
Ignition Engine 1: Off
Ignition Engine 2: Off
Ignition Engine 3: Off
Verify shutdown (N1/N2): Check
Main Door: Unlocked and Opened
Fasten Seatbelt Sign: Off
Passengers: Exiting/Exited
Shutdown/Parking Checklist Complete
------------------------------------------------------------------------------------------------------
After Passenger Exit Checklist
Cabin Lights: Off
Panel Lights: Off (If Turned on)
Cockpit Flood Lights: Off (if Turned on)
No Smoking Sign: Off
APU: Off
Beacon Light: Off
Battery: Off
Co-Pilot: Stand/Exit (If Needed)
Pilot: Stand/Exit (If Needed)
Doors: Shut and Locked
After Passenger Exit Checklist Complete
-------------------------------------------------------------------------------------------------------
EMERGENCY PROCEDURES
-------------------------------------------------------------------------------------------------------
Go-Around/Missed Approach Checklist
Throttle: Max
Pitch: 10-20 Degrees Nose up
Flaps: Up
Gear: Up
Return to Decent Checklist once re-established for decent to approach to airport
Go-Around/Missed Approach Checklist Complete
------------------------------------------------------------------------------------------------------
------------------------------------------------------------------------------------------------------
Total Engine Failure (Fuel Exhaustion or Mechanical Failure)
Ignition Engine 1: Off
Ignition Engine 2: Off
Ignition Engine 3: Off
Refer to Decent/Approach Checklist. Allow extra airspeed on approach than what recommended (Pitch Controls Airspeed)
Total Engine Failure Checklist complete
-----------------------------------------------------------------------------------------------------
Structural Failure Checklist
Identify Structural Failure: Check
Can you still Fly?
*Yes: Refer to decent/approach checklists
*No: Continue this Checklist
Realize You're Doomed: Check
Lie to your passengers: Tell them the plane is supposed to be doing this
Restrain yourself from screaming like a 5 year old school girl (God forbid they find your black-box)
Kiss your butt goodbye
Husky Aviation